Category Archives: MSWindows

How to keep selected local Windows folders in sync

Some web platforms, like Apache Tomcat and Voxeo Prophecy, require their configuration files to be kept in specific locations under the platform’s installation folderpath. This creates a minor annoyance when developing for these platforms, because your IDE may not be able to add such a folderpath to its workspace. But even if the IDE can access such a folderpath, or even if you can create a symbolic link to it, the IDE might add project-related files that would confuse the web platform.

As a workaround, I’m using FreeFileSync to define rules about which items from the two folders should be overwritten by newer files from the other folder. However, FreeFileSync only syncs when prompted to via its GUI. To automatically detect new files and trigger sync, you can use the companion app RealtimeSync (which is included in the FreeFileSync installer). Yet, RealtimeSync is an app rather than a service, so you need to configure Windows to launch it whenever you start Windows or resume from sleep.

Installing FreeFileSync

  1. This app’s sourceforge page has a download button, but it will lead you through several hops before you get to a mirror at “FossHub”.
  2. The download links can be hard to find. Look in the light blue box near the top for a set of links such as “Download FreeFileSync for Windows”.
  3. During the installation, avoid Express install because it will install bloatware; use Custom Install instead.

Configuring FreeFileSync

These steps are adapted from another guide.

  1. If there are any files already in the web platform folder(s) that you want under the IDE’s control, import them to the corresponding project folder(s) in the IDE now
  2. In FreeFileSync, click the small green ‘+’ button above the left file listing pane to add as many pairs of folders to sync as you need.RealtimeSync_config1
  3. Set the left folder listing to the project folder, and the right folder listing to the web platform’s configuration folder
  4. Customize the default syncing across all folder pairs by clicking the green gear button in the upper-rightRealtimeSync_config2
  5. Cause new items in the left folder to be copied to the right folder. Cause edited items in the left folder to overwrite the corresponding file in the right folder. Note that only files introduced after RealtimeSync is first started will count as “new”, which is a good thing if you don’t want all the files in the left folder copied over.
  6. If you need to override the default sync behavior for any pair, use the small gear button that’s between the folderpaths
  7. Click OK to close, then go to Program | Save As Batch Job
  8. I recommend creating a top-level Dropbox folder called Settings where this batch-settings file can be kept.

Configuring RealtimeSync

  1. Launch RealtimeSync
  2. Go to Program | Open and select the batch-settings file you just created.
  3. Click Start.

Configuring ScheduleTasks (Windows) to launch RealtimeSync

  1. Use Windows+Q to open the start menu search box, enter “schedule”. Either “Schedule tasks” (in Windows 8) or “Task scheduler” (Windows 7 and before) should be offered. Select it.
  2. In the app that appears, select Create Basic Task.
  3. Under General | Name, enter something like “RealtimeSync after login”
  4. Set the trigger to be “On local connection to any user session”
  5. Set the action to be “Start a program” and browse to RealtimeSync’s executable (probably at C:\Program Files\FreeFileSync\RealtimeSync.exe). Under “Add arguments”, paste a complete path to the batch-settings file. (I recommend the Copy Path feature of FileMenuTools, a separate app, for this frequently-needed ability.)
  6. Under Conditions, make sure there are no dependencies on idleness, AC power, etc.

Verifying that it works

  1. Logout of your Windows session, then log back in.
  2. Edit one of the project files and save it. The FreeFileSync dialog should appear within a second or two, and disappear within a second.
  3. Verify that the corresponding file in the web platform folder has the edited content.


Print Friendly, PDF & Email

Installing Windows7 on a 12″ Motion Computing M1400 TabletPC

My job involves reading and annotating a lot of PDFs, and doing so on a tablet seems much more comfortable than using a laptop. The tablet would have to support handwriting recognition, of course, because a laptop’s keyboard would be far superior to a virtual keyboard at an odd angle right at my pelvis. As of Fall 2011, there is no native handwriting rec ability in either Apple iOS nor Google Android, and apparently none in their app stores, either. Besides, their largest displays are 10 inches (diagonally), while an 8.5×11 inch page ideally needs a 14 inch display. Also, my favorite PDF annotation tool, Tracker Software’s PDF XChange PRO, isn’t available on those platforms. Fortunately, there are tablets dating from the early 2000s that have 12 inch displays, native handwriting rec support, and designed to run the OS that my PDF tool requires (i.e. Microsoft Windows). As an added bonus, those tablets can now be bought for around US$100 even though they sold for thousands when first released.

I’ll focus here on Motion Computing’s M1400 tablet. I found one for $99 on eBay with its original digitizer pen and Windows XP installed. One or two owners before me had experimented with it, because there was no apparent way to open the Input Panel to use handwriting rec, the device buttons didnt work (except the power button), and the virtual keyboard would open only if I booted with an external keyboard attached and entered Ctrl+U during boot to activate the Utility Manager and turn on the virtual keyboard. A further problem with the hardware itself was that it got quite hot while in use, too hot to keep in one’s lap.

Installing Windows7 (the lowly Home Premium variant is sufficient) solved all of the software problems, and the device no longer gets more than mildly warm.

One new problem is that the display cannot be rotated to portrait orientation, because Intel refuses to release an updated video driver for this CPU chip for Windows7. However, some people have had success running the video driver in XP Compatibility mode, which requires installing the Professional or Ultimate variants of Windows7. I recommend installing Comodo Time Machine after the OS install and before any changes to drivers or registry settings, so you don’t have to reinstall the OS in case of an error.

By the way, I had never heard of Motion Computing before buying this device, but I am very impressed by them. They provided free tech support for a product they hadn’t sold in 5 years, it was very quick, and very thorough. If they offer a 12+ inch Windows8 tablet, especially if it has a color eInk/LCD dual display, it’ll be the first one I consider buying.

If landscape-only orientation is okay with you (and possibly no audio), here’s what you need:

  • Motion Computing M1400 tablet
  • Windows7 Home Premium installer software
  • external usb-connected keyboard with arrow keys
  • CD/DVD external usb-connected drive (or 4GB usb drive + laptop/desktop with CD/DVD drive)
  • Ethernet cable to your router

Follow these steps:

  1. The following procedure will NOT leave your files on the tablet in place. Many of them will be moved to c:windows.old, but you should probably make a backup copy of any that you would hate to lose.
  2. If you use PDF XChange 4.0 (but not the portable version), and if you have a session that you want to remember (i.e. a set of open PDFs), then be sure to note down the filepath of each (in addition to backing up the file itself in step 1 above). Although this PDF viewer is great, they don’t yet support session backup (nor syncing).
  3. If you don’t have an external CD/DVD drive, you’ll need to make the usb drive bootable. Don’t forget to copy all the installer software to it.
  4. Connect the external keyboard and the external drive.
  5. Make sure that the tablet can boot from the external drive:
    1. Reboot the tablet and the white Motion Computing screen appears, hold the digipen tip to the screen. A context menu should appear; select Launch System Setup.
    2. The PhoenixBIOS Setup Utility should open. Tap the Boot tab along the top.
    3. If you’ll be using an external CD/DVD drive, then “CD-ROM Drive” should be listed higher than “+HDD”. If it’s not, then look at the bottom and tap the white down arrow to the left of Select Item until CD-ROM Drive is highlighted in white, then tap the + to the left of Change Values to move it up the list.
    4. If you’ll be using a bootable usb external drive, then tap the white down arrow until +HDD is highlighted in white. Tap the white Enter to the left of “Select > Sub-Menu”. A submenu should open below HDD, and the external usb drive should be listed above the hard drive; if it’s not, tap the white down arrow until the usb drive is highlighted in white, then tap the + to move the usb drive higher in the submenu.
    5. When finished, tap the white F10 at bottom right to save and exit. A yes/no confirmation dialog will appear. Click yes. A beep will sound and you should exit to the Windows bootup process on your external drive.
  6. At this point, the digipen was no longer recognized for me, but the arrow keys on the external keyboard did.
  7. When you are prompted whether to enable WindowsUpdate, I recommend not doing so. It’s a great feature, but when I did this procedure the first time and turned this feature on, the installation of Windows7 SP1 introduced a bug that made several applications give errors about not having the right permissions, or not having enough space on disk, and I could not uninstall some apps like Comodo Time Machine, either.
  8. During the install process your machine will reboot, and if you booted from a usb drive, you’re going to boot from it again (unless you’re quick and yank it). If you do boot back into the install dialog again, just move the power switch to off, yank the usb drive, and power on. Installation will pickup from where it should.
  9. Once Windows7 is installed, use the Ethernet cable to connect to your router so you can get drivers, especially a wifi driver. The external usb drive and keyboard can be disconnected.
  10. To get drivers, go to Start | ControlPanel | DeviceManager, hold down the pen button while clicking on Display Adapters (i.e., do a right-click), and select “Scan for hardware changes”. This should trigger a search on Microsoft/manufacturer sites for all the drivers you need, not just display adapters. If you turned off WindowsUpdate during install, you’ll get no drivers at this point and should click the Change Setting button, then the Yes radiobutton. You should get drivers for:
    • Intel PRO Wireless 2200BG Network
    • Motion Computing Tablet PC Buttons
    • AuthenTec AES2501 (fingerprint sensor)

    Even with this, I could not get drivers for:

    • Video controller
    • Multimedia Audio Controller
    • PCI Modem
  11. You should now have wifi connection ability, so the Ethernet cable can be removed.
  12. By default, if one holds the digipen to the screen for a short while, it will be interpreted as a right-click. This is a problem if one uses a multi-level dropdown menu and wants to select anything other than the first item in one of its submenus. To disable this, go to Start | ControlPanel | Pen And Touch | Pen Options, highlight “Press and hold” in the list, and click Settings. Turn off the “Enable press and hold for right-clicking” checkbox.
Print Friendly, PDF & Email

Open a page in the default browser following a schedule

The notification component of our wiki (plone) isn’t useful enough to bother with, so as a workaround I view its “Recent Changes” page on a regular basis. Well, as regularly as I can remember, which hasn’t been regular enough. So now I use Windows7’s Task Scheduler to open the page for me on a repeating schedule.

This should also be useful for catching regular Internet radio programs.

Steps:

  1. Start | All Programs | Admin Tools | Task Scheduler | Create Task (in far right pane)
  2. General tab
    • Enter a name you’ll recognize later
  3. Triggers tab | New…
    • Enter when the task should occur
  4. Actions tab | New…
    • Action = Start a Program
    • Program/script = rundll32
    • Arguments = url.dll,FileProtocolHandler http://yourFavoriteSiteHere.net
  5. Conditions tab
    • Start only if the computer is on AC power => off
    • Wake the computer to run this task => on
  6. Settings tab
    • Run as soon as possible after scheduled start is missed => on
Print Friendly, PDF & Email

Portable Windows with/without admin privilege

Update: SORRY! It turns out that VirtualBox ties its configuration very closely to specifics of its host machine (such as through the MAC address), so I have to back away from the “portable” claim in this post’s title. Until VirtualBox realizes the value to them of supporting portability, using VirtualBox won’t actually help you go portable.

Previously, I described how to get some freedom from the “no admin privilege” restriction that many workplace computers have. That technique involved running specially-built versions of one’s applications from a thumbdrive. After trying that for a month or more, I grew tired of the following limitations:

  • Many useful apps aren’t built to run from a thumbdrive, often because they use the registry
  • Going back to Firefox from Chrome wasn’t a good fit for me (and Chrome isn’t really portable yet)
  • One can’t control default applications; for example, one can’t directly open links in messages in portable Thunderbird using one’s portable browser

There is a framework called qemu that allows running an entire operating system from a thumbdrive, and it can do so in a mode that doesn’t require admin privilege. But this mode can’t access USB peripherals like keyboards, mice, and other drives connected to the host computer. The final deciding factor against qemu for me is that OSs make many writes to the storage they boot from, and thumbdrives allow only thousands of writes before their storage capability degrades.

If you really want to try qemu before my final solution, here’s what I tried with it:

  1. Install Qemu manager on usb
  2. Set VM RAM to 512MB
  3. Give the VM whatever name you want, and whatever OS label you want…I used “Windows7Portable” for both
  4. Start VM
  5. In VM/Qemu Client, click CD Drive button in menu bar and browse to your Windows 7 RC ISO file
  6. Wait while OS installer gets going…I had to quit and go to bed before it finished

Here are some related links that were helpful:

Because qemu would not be able to use usb-connected keyboard and mouse, because I’d have to copy it to a new thumbdrive fairly often, and because it would be pretty slow by most accounts, I decided to give up on the “no admin privilege required” goal. Instead, I asked my IT dept to install VirtualBox. The following steps were inspired by a Lifehacker post.

  1. Get a portable hard drive. I got a Maxtor 160GB “Basics” model for about US$60.
  2. Plug in the drive to any machine you plan to use where you don’t have full control, then check that you can write to it. (For example, right-click in the drive contents shown in Windows Explorer and choose New | Text Document.) If you can’t write to it, ask your IT dept to grant you write permission for it.
  3. If you’re going to overwrite a virtual disk file you may already have on the portable drive, and you use Chrome, be sure to export your bookmarks and open tabs to the host first. (ouch)
  4. Have VirtualBox installed. Then copy its .VirtualBox directory to your portable hard drive.
  5. Start VirtualBox and go to File | Preferences | General. Change “Default Hard Disk Folder” and “Default Machine Folder” to .VirtualBoxHardDisks and .VirtualBoxMachines on your portable drive.
  6. In VirtualBox, press the New button.
  7. Click through the Next buttons, including leaving virtual memory at 512M.
  8. Click through more Next buttons, including the creation of a new boot (virtual) hard drive of size 20GB. This virtual drive will be kept in .VirtualBoxHardDisks
  9. Choose Dynamically-Sized storage
  10. Take a lunch break while the VDI is created. I also created a brief “reward if returned” text file with contact info at the root of the portable drive.
  11. Once your virtual drive is created, click the Settings button, then the CD/DVD tab and the Add button, and browse to the ISO file of the OS you want to run in the virtual machine. For me, this was Windows 7 RC and my “host” is Windows XP. Click Ok and return to the main VirtualBox window.
  12. Click the Start button. You should eventually see the OS installation prompts. Answer the prompts the way you would if you were installing to a machine sitting right next to your current one and on the same network.
  13. When the OS has been installed (it may need to reboot itself within the window a couple times, but won’t affect the rest of your computer), go to Devices and select Install Guest Additions. This will make it much easier to use your keyboard and mouse. (If you have difficulty getting to the menu, hit the Ctrl key on the right of your keyboard and then try again.)
  14. Once the OS is installed, you can move or delete the ISO file. If VirtualBox complains about not being able to find the ISO file, just use the button to remove it from the CD/DVD mounts.
  15. To get access to folders on the host machine:
    1. Turn on sharing for each of the folders you want to access.
    2. In your VM window, go to Devices | Shared Folders. The “Folder Path” browse button should allow you to select one of the folders you just shared
    3. To make the shared folder appear among the drives shown under Computer in your VM OS (“the guest machine”), go to the Start menu, type in “cmd”, and then type in “net use s: \vboxsrvMyHostFolder” where MyHostFolder is replaced by the name of a folder you shared, and where s: is replaced by a drive letter not already in use.
  16. You should now be able to copy all the data folders from your host to the guest.
  17. Go ahead and install all the apps you need on the guest. I have some recommendations:
    1. Do not install an antivirus program. They can make your guest unusable by turning its display to snow and ignoring your commands. This is the most significant sacrifice I’ve encountered so far.
    2. Use Mozy to backup your data. The first 2GB is free, and you won’t have to remember to backup again.
    3. Windows Explorer settings
      • Change default folder to Computer
        1. Right-click on Windows Explorer in taskbar
        2. When “Windows Explorer” appears in the “jump list”, right-click on it and select Properties
        3. For Target, enter
          %windir%explorer.exe ::{20D04FE0-3AEA-1069-A2D8-08002B30309D}
      • Organize | Folder and Search Options | View
        • Show hidden files, folders, and drives => checked
        • Hide extensions for known file types => NOT checked
        • click Apply to Folders and have it apply to all folders
    4. Control Panel | Programs | Turn Windows features on or off | Games => NOT checked
    5. Control Panel | Taskbar and Start Menu | Start Menu | Customize
      • Computer, Control Panel, Personal folder = > Display as menu
      • Documents, Games, Music, Pictures => Don’t display
      • Run => checked
      • System admin tools => Display in All Programs and the Start menu
      • Use large icons => NOT checked
    6. Pin to taskbar: Cmd shell, Calculator, CharMap
    7. Set built-in Windows Defender (anti malware) to run everyday over lunchtime instead of at 2am, since the portable drive may be disconnected overnight.
    8. Media players like Winamp stutter when run in a VM. I run them from the host instead.
  18. If some of the options for setting screen resolution in your guest are disabled, you might be able to enable them by running this in a cmd window in the host:
    C:Program FilesSunxVM VirtualBox>VBoxManage setextradata global GUI/MaxGuestResolution any
  19. Whenever you need to take the portable drive with you, go to Machine | Close | Save Machine State. All your open windows and state will be saved and the VM will close. Quit VirtualBox so it doesn’t hold onto the VDI file on the drive, then unmount the drive via Safely Remove Hardware. If something still won’t let you unmount, then you may have to shutdown the host.
  20. I have been closing down my VM every night, because when I’ve allowed it to run for several days before shutting down, VirtualBox seems to get stuck in a “stopping” state. It’s not clear if this is a bug in VirtualBox or a behavior in Windows 7 that can be configured not to happen.
  21. Finally, as a note to myself, here are some preferred Win7 settings and applications:
    1. Desktop context menu | View | Small icons
    2. Unpin Windows Media and IE from taskbar
    3. Taskbar properties:
      1. Use small icons
      2. Dock at bottom
      3. Never combine/stack buttons
    4. My favorite apps:
      • Java 1.6 SDK with Netbeans
      • Chrome from the dev channel
        • Create a shortcut and append –enable-sync to the Target value
        • While I would like to pin the shortcut to the taskbar, I’m not sure the –enable-sync flag would survive that, so I put the shortcut in the Startup folder instead. (My bookmarks on different machines have been out of sync for a few days, and I suspect this is because I was starting the browser from the taskbar.)
        • Install AdSweep ad-blocker extension by clicking here
        • under (wrench menu)
          • Turn on syncing of bookmarks
          • Always show bookmarks bar
          • under Options
            • under Basics
              • On startup | Restore the pages that were open last
              • Home page | Show Home button on the toolbar => off
            • under Personal Stuff
              • Passwords | Offer to save
              • Themes | Get Themes | Themes by Google | Greyscale
            • under Under the Hood
              • Download location | Desktop
              • Ask where to save each file before downloading => off
        • Right-click on these tabs and select Pin to tab:
          • Evernote
          • Gmail
          • Gmail calendar
          • Google reader
        • Right-click in address box and select Edit Search Engines, then change these keywords:
          • Wikipedia => w
          • Google Scholar => s
          • Lifehacker => l (small L)
          • Amazon => a
          • Google groups => g
          • Download.com => d
          • Google image search => i
          • Youtube => y
          • Ebay => e
        • Wishlist: Save session/open-tabs, Pinned tabs, and Search Engine Settings to Google bookmarks or some obvious file that I could backup
        • Wishlist: An official theme that matches my Windows default theme!
      • Mozy
        • I keep all my files in 4 desktop folders; I backup only parts of these:
          • Business
          • Papers: Articles by others in PDF and HTML format
          • Projects: Workspaces for IDEs, Todo lists, etc
          • Tools: Portable apps, Printer drivers, Installers
        • Schedule | Alert me if a backup hasn’t happened in this many days => 1
        • Options
          • Notify me when a backup starts => off
          • Show status when a backup successfully completes => off
      • portable Thunderbird email client with Lightning calendar extension
        • Pin to taskbar
      • Notepad++
        • Pin to taskbar
        • Settings | Preferences
          • Global
            • Toolbar | Hide => checked
            • Tab bar | Vertical => checked
            • Tab bar | Enable close button on each tab => checked
          • Misc | Remember current session for next launch => checked
      • portable PDF XChange Viewer
        • Pin to taskbar
      • IZArc unzipper
        • During install, make these settings:
          • Explorer Enhancements tab: Extract Here, Extract to <folder>, Email, Create self-extracting, Test, Display icons on context menus => NOT checked
          • Program Locations tab: Default viewer => Notepad++
        • Wishlist: a setting that allows “Extract all subfolders” as the default
      • OpenOffice
        • Pin to taskbar
      • doPDF virtual printer (use browser’s Print command to create PDF version of webpages for archiving)
    5. Pidgin
      • Don’t pin to taskbar; it will be added to hidden system tray
      • Buddies | Show | Offline buddies
      • Create shortcut and drop in Startup folder
      • Preferences
        • Interface | Show IMs and chats in tabs => off
        • Conversations | Enable buddy icon animation => off
        • Sounds : Enabled only for “Message received”
        • Logging | Log all instant messages => on
    6. TweakLogin
    7. Google Calendar gadget. Move to lower right corner.
    8. Amzi Eclipse IDE version 8 for Prolog and Java
      • Pin to taskbar
      • Set workspace to DesktopToolsEclipseWorkspace
  22. One would think that “.pdf” would appear at Control Panel | “Associate a file type or protocol with a program” but it doesn’t. Instead, double-click any PDF, choose “select a program”, choose your PDF viewer, and make sure the checkbox is checked for “always use the selected program”. (This entire step is probably only necessary because I use the portable version of the viewer, and it doesn’t create entries in the registry.)
  23. Go to Control Panel | Devices&Printers and add the office Grayscale and Color printers
  24. Get more free wallpapers from Microsoft
Print Friendly, PDF & Email

How to sync Windows Mobile with both Exchange and Google

For Windows Mobile phones, Google suggests that you use the ActiveSync program on the phone to connect to one of their servers. This is problematic in principle for me, since ActiveSync allows only one connection with a server to be configured, and I need that to stay synced with work email. It also didn’t work even when I experimented, first with ActiveSync, and later with Funambol’s WinMo client.

What did work was the free GMobileSync client. The 1.3.7 beta version supports multiple Google calendars, but one cannot select to sync just a subset of them, nor are secondary calendar events shown any differently than events from one’s default calendar. (Suggestion to GMobileSync: Allow defining a 2-letter uppercase code per calendar in device settings; strip these when syncing back to the server so they don’t appear to have changed.) It doesn’t sync contacts, but that feature is said to be coming. And syncs can’t yet be scheduled to happen automatically (but you can get CT Scheduler Lite free and tell it to launch the sync, but then you still have to press the Sync button — there is no parameter to automate that part yet; to install, download to a machine where you have admin privileges, or email them for the CAB file).

As part of your move away from Microsoft, at least on the desktop, you may want to use Mozilla Thunderbird+Lightning to manage your Google Calendar.

You may also want to try FinchSync with GCalDaemon.

If you want to try it the way Google suggests, you might need help from this and this (from these matches) and use Funambol client for WM with these settings:

Server URL: https://m.google.com:443/syncml

User: [yourname]@gmail.com

Password:[your gmail password]

If you really want to use ActiveSync with two servers, it’s said to be possible, but one must first find a way to edit the device’s registry:

So, to sync two exchange servers, put this in the device’s registry:

[HKEY_CURRENT_USERSoftwareMicrosoftActiveSyncEnableNonLocalCrossPollination]
= (DWORD) 1

This key will most probably be there already, but if it is, its value
will be 0. If so, change it to 1.

Soft reset, then, setup activesync ON THE DEVICE (If you try setting up
on the PC, it will still fail).

There are also paid services that are geared to people who want more features or who want to avoid doing all this IT work themselves:

  • http://www.scheduleworld.com/
  • http://www.goosync.com/
Print Friendly, PDF & Email

Going portable as an alternative to using a remote desktop

This tip is intended for people like me who:

  • Often need to work outside the office but don’t want to carry a laptop
  • Happen not to use any Linux or Mac machines, just Windows
  • Can’t use Window’s Remote Desktop Connection app. (Perhaps your IT dept won’t open the port in their firewall; but if the problem is just that you’re using a Home version of Windows, you could switch to a Business version or upgrade to an Ultimate version.)
  • Can’t use the similar VNC app because your client computer has User Account Control turned on and you want to keep it that way for security reasons.
  • Or, your IT dept won’t give you admin privileges on your machine, so you can’t install apps at will
  • If you use SVN, then either your SVN repo has a publicly-accessible IP address, or that you can access it via VPN. (That is, if you need to use SVN but it’s kept behind a firewall, then these instructions won’t help you access it…you’re stuck working non-portably.)

The next best alternative I’ve found is to use a thumbdrive to keep your documents and applications (plus application state such as licenses, passwords, bookmarks, files currently being edited, email and contacts, etc).

If all the desktops you’ll use the usb drive with are XP, then you could put MojoPac on the usb; it emulates an OS and provides a desktop view of your usb that runs as a window in XP. It’s not clear if there will ever be a version that works with Vista or Windows 7.

Encryption

Before copying any files to your thumbdrive, or installing any portable apps, consider whether you’d be hurt if the thumbdrive were lost or stolen and someone got access to its contents. If that’s at all important to to you, there are four options:

  • If you expect to have admin rights on any computer you might use, then you could install TrueCrypt on your thumbdrive and also create a TrueCrypt file container there.
  • If you don’t expect to have admin rights, but can convince your IT dept to install TrueCrypt for you, then check out the instruction in the next paragraph.
  • Or, if you won’t need more than 1G of space encrypted on your thumbdrive, you can try Rohos Mini Drive. (I haven’t)
  • Otherwise, you need to use Remora, where you will have to manually unencrypt each file you would want to use, then manually re-encrypt it after saving. (I haven’t tried this either)

If you can go with TrueCrypt, then install it on your harddrive. Use it to encrypt the thumbdrive. You can configure the encryption so you are prompted for the password as soon as you plug in the thumbdrive anywhere; then, you will be able to access files and run apps from the drive as though it weren’t encypted but all your edits and adds will be encrypted. (Things will run slower due to the on-the-fly encryption, although perhaps not noticeably so.) You might want to encrypt only a folder of documents, but I opted to encrypt everything because apps like Thunderbird store one’s data (e.g. all one’s email, if you have opted to keep local copies) in generally unpredictable places. After installing TrueCrypt, do this (basically following TrueCrypt’s beginner tutorial):

  1. Do the following from a machine where you have admin privileges
  2. Start the TrueCrypt application from your desktop
  3. Click the Create Volume button
  4. Select “Create an encrypted file container”. (I tried “Encrypt a non-system partition/drive”, but when I plugged the drive into another machine where TrueCrypt wasn’t installed, I was prompted to format the usb drive.)
  5. Select “Standard TrueCrypt volume”
  6. Click “Select file”
  7. In the file selector popup, select your thumbdrive in the left pane, and for “File name:” provide a name for your container. Mine is “TrueCryptContainer”, but the paranoid might want to use “junk”. Then hit Save.
  8. In the Encryption Options view, just hit Next.
  9. When prompted for file size, use the full capacity available (e.g., 3680 MB for a “4GB” usb drive). Then Next.
  10. Choose a good password. Next.
  11. For Volume Format, set Filesystem to NTFS (or, if you can’t get admin privileges anywhere, choose FAT). Move your mouse around over the window several times to generate a good random seed for the encryption algorithm. Then click Format.
  12. When formatting’s done, close that dialog window.
  13. Back in the main TrueCrypt dialog, the one showing a list of unused drive letters, choose a letter you want your new container mapped to.
  14. Click the “Select File” button and choose the container file you just created.
  15. Click the “Mount” button. You’ll be prompted for the password you assigned. Sometimes this doesn’t work for me and I have to cancel and then hit Mount again before it works.
  16. Once it works, you’ll see your container file listed alongside the drive letter you chose in TrueCrypt’s main dialog. And the drive letter should appear in WindowsExplorer under “My Computer” along with your other drives. You should be able to open from and save to this encrypted container using any application’s File Open and File Save commands.
  17. Be sure to use the Dismount button before trying “safely remove hardware” and before removing the thumb drive.

Sync with desktop or server/cloud

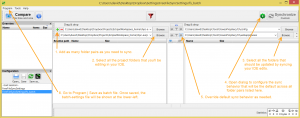
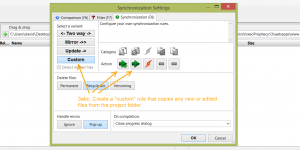
After encryption, this is probably your highest priority. You can try a portable application like Toucan, but I think it’s not full-featured enough. For example, one needs to type or paste in paths when defining items to skip, instead of selecting them through a browse button. And my rules for skipping items were ignored anyway. Instead, rather than using a portable app to do the syncing, you probably just need to sync to one primary desktop, and Microsoft’s SyncToy running from that desktop works well. I configured it to sync docs/projects and apps separately, and I set my desktop-to-cloud sync service Mozy to sync just the docs/projects from the desktop (because I want double protection for things I can’t just reinstall and reconfigure). As a further step, I use Windows Task Scheduler (See “Help | Learn how to schedule SyncToy” within SyncToy) to kick off these SyncToy tasks near the end of every workday. Setting SyncToy to run at the end of a workday assumes your backup desktop is your work desktop; to sync to a desktop at home, you probably want the trigger event to be the insertion of your usb drive. TaskScheduler doesn’t natively support “mounting of usb drive” as a trigger, but you can buy MyTrigger for US$24 which enables TaskScheduler to launch SyncToy for such an event.

Default programs

Once you start reading email from Thunderbird on your thumbdrive, when you click links in msgs you’d want them to open with the browser also on your thumbdrive (especially if you might bookmark the link or enter a password). This doesn’t happen automatically; instead, you’ll get whatever app has been set as the default handler of the kind of file you want to open (where “kind” is determined by the file’s extension — the part after the dot). There is no good solution in XP nor Vista to this general problem of wanting to set usb-hosted apps as default handlers (but Windows 7 appears to support it).. However, just for the case of handling urls when they appear in apps other than the browser, one can make a desktop-hosted Firefox the default handler and then use the Foxmarks extension in that installation and all one’s other Firefox installs (including the portable one), since the extension syncs bookmarks and passwords across machines. (However, there does not appear to be any Firefox extension that syncs one’s open tabs, aka session.)

Auto-start when inserting drive

Many people like certain apps on their drive to launch as soon as it’s plugged in. PStart is a portable application with a small window (aka “panel”) where one can list other apps hosted on the same drive, and set some of them to launch when the drive is mounted. To make this work, however, one needs to configure each desktop OS to “autoplay” usb drives whenever they are inserted. XP and Windows 7 will prompt you if you want this done when you plug in your first usb drive, but Vista requires extra work:

  1. Open your run box (Start | Run) and type regedit and click OK.
  2. Go to HKLMSOFTWAREMicrosoftWindowsCurrentVersionPoliciesExplorer.
  3. You should see a key called NoDriveTypeAutoRun (see picture below). Double click it and set the Value Data to 91 (hexadecimal).
  4. Restart your computer and it should be fixed.

Now install PStart to your usb drive.

Once it’s installed, open its panel and go to Setup | Create autorun file. Select the drive letter that’s mapped to your TrueCrypt container. (You might want to tweak the autorun.inf file even further.)

You can also tell PStart to launch any programs listed in its panel when PStart launches. To do so:

  1. Right-click on the item in the panel (or add it by right-clicking in an empty part of the panel and selecting “Add file”)
  2. In the dialog that appears, click the Advanced tab
  3. In this tab, set Autorun to “on startup”

Reminder to take your drive when you log-off

This is useful, but the Quiet version requires that you log-off instead of using Safely Remove Hardware.

Force apps to release thumbdrive

If you often have the problem of Safely Remove Hardware failing to dismount the drive, you might consider this workaround. However, there seems a pretty fair chance of data loss. (If you use PStart, the culprit might be that in Settings you don’t have “when closed” set to “exit application”.)

I’ve heard that Windows 7 will actually tell you what application is holding onto the drive (but not what file it’s using).

Reward if returned

You probably want to create a text file at the root level of your drive called REWARD IF RETURNED.txt providing your email address, and make sure the file remains unencrypted. Or, you may want to make the name of the drive your email address or phone number.

Mozilla Firefox browser

I prefer Google’s Chrome browser, and there is a portable version (steps available below) but I haven’t found any way to export bookmarks once one starts using the portable version; that’s a critical flaw, because when I’ve installed updated portable versions, I’ve had to lose any bookmarks accumulated since I first started using the portable version. So, I’m using portable Firefox instead. (Update: I’m using Foxmarks because portable Firefox is slow, particularly when scrolling.) For portable Firefox, I recommend the following addons:

  • Xmarks – Keep your bookmarks in sync across machines and drives
  • Download Statusbar – I find it annoying that FF uses a popup to acknowledge every download attempt, and the designers of this addon felt the same
  • Undo Closed Tabs Button – If you were too quick to close a tab and want it back, this feature will help you
  • Tabs Open Relative – When you right-click to open a link in a new tab, it should appear right next to your current tab, not way down at the right. This feature fixes that.
  • Firebug – Useful for designing/debugging web pages
  • Zotero – Useful for managing a library of e-documents, such as you may have on your usb drive

And if you really want to use portable Google Chrome, here’s how:

  1. The portable version is available from a German developer, and you’ll have to get a translation of his blog page (plus the download link) from Lifehacker.
  2. To copy over your default tabs and settings, (for Vista) copy your C:UsersyournameAppDataLocalGoogleChromeUserDataDefault contents to Portable_Google_Chrome_0.2.149.30Profil
  3. Migrating bookmarks from desktop Chrome to portable Chrome takes several steps
    1. Download and install Mark Clouden’s chrome bookmark exporter
    2. Run it and hit the Export Bookmarks button. Make sure it refers to the chrome installation on your harddrive rather than the one on your thumbdrive.
    3. We’re going to use Firefox to import the bookmarks, so we can tell Chrome on your thumbdrive to import bookmarks from it. So run an instance of Firefox where you don’t mind emptying all existing bookmarks first.
    4. In Firefox’s menu bar, go to Bookmarks | Organize Bookmarks, and delete all bookmarks in the Bookmarks Toolbar and Bookmarks Menu.
    5. Click the Import and Backup button at the top. Choose Import HTML.
    6. Select “From an HTML file, then select the bookmarks.html file you created with Clouden’s exporter.
    7. It may take awhile to import; wait for the bookmarks you expect to appear. Then quit Firefox.
    8. Start Chrome from your thumbdrive, then go to (Wrench icon in upper right) | Import bookmarks & settings.
    9. Set From to Firefox and click Import.
    10. You’ll find your bookmarks if you click “Other bookmarks” in the upper right, and then “Imported from Firefox”. You can drag items out of “Bookmarks bar” in this view right onto Chrome’s bookmarks bar. And you can drag the other bookmarks and folders onto “Other bookmarks” itself, and then right-click on empty folders to delete them.
  4. You may want to change the default download location under (Wrench icon in upper right) | Options | Minor Tweaks
  5. You may also want to tell Chrome to reopen the same pages when you restart it. Go to (Wrench icon) | Options | Basics | Startup | Restore the pages that were open last

Notepad++ text editor

PortableApps.com has a portable version of this very powerful and popular text editor. I recommend renaming the .exe file and all other folders and files that contain “++” to “NotepadPPPortable” because some sync/backup tools like Toucan have a problem with +’s in filenames.

Mozilla Thunderbird email client

PortableApps.com has a portable version of this email client and address book application. But there’s no way to connect to your office Exchange server unless they’ve enabled IMAP or POP support. (But if you have a mobile phone running Windows Mobile, its email client does support Exchange.) Also, I recommend adding the following extensions:

AntiVirus

PortableApps.com offers the ClamWin antivirus checker.  Note that this is only useful when you suspect a there is a problem, probably in a specific file. It is not a schedulable scanner. You would probably use it only after disconnecting your thumbdrive from a computer you have borrowed.

WinAmp media player

Just copy C:Program FilesWinamp to your thumbdrive. But disable Winamp Agent, or it will prevent unmounting the thumbdrive.

Unzip / file compression

I used to use the version of 7-zip available from PortableApps.com, but I find its UI very nonintuitive and am now very happy with IZArc, which has a portable version.

OpenOffice for docs, drawings, spreadsheets

PortableApps.com offers OpenOffice. OO’s doc writer is a great replacement for MSWord, and its drawing app is far better than Visio in my opinion.

PDF-XChange viewer

This PDF viewer is free, portable, and supports highlighting, comments, and typewriter features. The typewriter is great for filling out forms.

I’m providing a link for the PDFXChange download, because the creator’s web site is so poorly designed and confusing. But the software itself is really good, and I bought a license for the extra features.

Application launcher

Launchy is a very popular choice, and its online PDF help file explains how to run it in portable mode. An alternative that bundles encryption and autorun scheduling is GeekMenu.

Skype messenger and internet phone

I haven’t tried it portably, but here’s a tip.

Eclipse IDE

(A programming environment for Java, C, and other languages like Prolog)

These instructions are adapted from a forum post on PortableApps.com:

  1. If you’re going to use SVN as source control, make sure your SVN repository has a publicly-accessible IP address, or that you can access it via VPN.
  2. Run all updates in the Installed Software tab.
  3. Select Core SVNKit Library under http://eclipse.svnkit.com/1.2.x/Revision Graph, Subclipse
  4. Select SVNKit Adapter under http://subclipse.tigris.org/update_1.4.x
  5. Disable SVNKit library version 1.2.1.5297
  6. Once you launch Eclipse and select a workspace, the full filepath to that workspace — including drive letter — will be saved to eclipseconfiguration.settingsorg.eclipse.ui.ide.prefs. Because the drive letter assigned to the thumbdrive can differ across machines (and even across uses of the same machine), you probably want to edit this file so that the final line has no drive letter. For example, mine is RECENT_WORKSPACES=ProjectsEclipseWorkspace
  7. Eclipse seems to change eclipse.ini each time it runs by updating the ‘-vm’ value, and for me it puts an absolute path there including drive letter. So you may want to make eclipse.ini read-only to avoid this bug.

Unfortunately if you are a Prolog coder wanting to use Eclipse, there is no way to work truly portably. There is just one version of Prolog that runs in Eclipse that I know of, Amzi (which works very well), but it depends on environment variables in your OS and there is no way to provide these vars via an Amzi config file (yet). However, if Amzi is installed on your desktop, then an Eclipse running from your usb drive will be able to support Prolog. I have only tried this when I’ve installed Amzi on both the desktop and in the Eclipse on my usb. Here’s how:

  1. Go to the Amzi Logic Server download page and scroll down to section “3. Existing Amzi! and/or Eclipse Users”. Follow that.
  2. When prompted for a Destination Folder, be sure you select a folder on your thumbdrive (I selected “F:AppsAmziProlog”).
  3. When that’s done, you can enable Prolog support in Eclipse by following Amzi’s install instructions in the section on Existing Eclipse Users.
  4. After restarting Eclipse, go to Windows | Open Perspective | Other | Prolog.
  5. Then do the same to open the Debug perspective.

Task manager / Todo list

I’m not quite obsessive enough yet to need a multi-level task manager, but ToDoList offers that capability and can run portably.

Wishlist

  • An app that monitored the health of the usb drive and warned me when it’s time to copy its contents to a new drive. (I already try to auto-sync the drive to my laptop at home whenever I remember/have time to plug it in, and that laptop auto-syncs in turn with Mozy.)
  • A desktop-hosted antivirus that scanned any usb inserted before allowing it to autoplay.  This may just require me to hunt more; I currently use Kaspersky, which seems to work very well, but it’s not clear if it does this and their tech support has ignored my questions about it.
Print Friendly, PDF & Email

Prevent HTC phone from switching to Ulaanbaatar time from Singapore/Malaysia time

My HTC Hermes (AT&T 8525) keeps switching from the time and zone I set in Settings — in particular, from Singapore/Malaysia’s timezone to Ulaanbaatar’s. I found just one Google match about this problem: http://www.ppcsg.com/lofiversion/index.php/t93410.html, and it indicates the problem also affects the HTC Touch. The solution is to go into the Phone app, Menu, Options, find the Time Zones tab on the far lower right, and uncheck “Automatic change time zone and clock”.

Print Friendly, PDF & Email

“virtual directory not being configured as an application in IIS”

Parser Error Message: It is an error to use a section registered as allowDefinition=’MachineToApplication’ beyond application level.  This error can be caused by a virtual directory not being configured as an application in IIS.

If you get this msg in your browser, then do:

  1. Open Settings/ControlPanel/AdminTools/IIS/(this computer)/WebSites/DefaultWebSite/(your branch dir)
  2. Right-click your project folder
  3. Select Properties
  4. Click the ‘Create’ button for ‘Application Name’
  5. Restart IIS
  6. Re-request your page
Print Friendly, PDF & Email

“Failed to access IIS metabase”

Try reinstalling ASP.NET 2.0:

c:windowsmicrosoft.netframeworkv2.0.50727aspnet_regiis -i

Also make sure that the IIS console shows that, for Properties|ASP.NET of each of your web-shared folders, that v2.0 is shown in the first dropdown.

Print Friendly, PDF & Email

Trick IE into reserving a connection for Comet traffic

“Comet” is a dhtml technique for sending updates from the server to a browser client. One way to do it is to place a hidden iframe in one’s page and have the server write a <script> to the response whenever there’s an update; the script executes as soon as the client receives it, and it might popout a window containing a new message or change styling in the parent doc. In order for the client to keep getting updates, the server purposely never indicates that it has finished writing the response.

A webapp that uses Comet typically needs one connection for Comet and one to send requests to the server whenever the user makes some kind of edit (aka RPC = remote procedure call).  While the second connection isn’t needed all the time, IE6 permits only two connections to be used at any time, so any other windows open in IE have to fight with your service for them, which sometimes leads IE to close one of your connections prematurely.

Although it’s not friendly to such other services, one can trick IE into reserving one of its connections for your Comet page by requesting that page from a different domain than one makes RPCs from. If the server must maintain state, the domains can even point to the same machine (although you probably need to map both domains to a switch that then uses a cookie to find the particular machine)

To simulate such a setup on a Window dev machine, add the following line to C:WINDOWSsystem32driversetchosts

127.0.0.1       fake-domain1                       fake-domain2

Print Friendly, PDF & Email

IIS fails to serve pages, although ping succeeds

After many failures to install VS2005 on my laptop, I got a second machine and reinstalled XP (and drivers) in order to bypass any app conflicts. This wiped out McAfee (which was part of the install image), and the XP install turned on its firewall by default in response.

I hadn’t noticed that the firewall was on, and when I tried to get IIS to serve a simple xml file from its doc root (c:inetpubwwwroot), only the hosting machine could access it. Yet ping from other machines to the IP name worked.

I looked in the IIS access log at c:Windowssystem32LogFilesW3SVC1ex*.log, and there weren’t even any access attempts from other machines shown. Googling “The page cannot be displayed” revealed the firewall involvement.

To disable the firewall, Start|Run, and enter “Firewall.cpl” and follow the prompts.

Print Friendly, PDF & Email

“A project with an output type of Class Library cannot be started directly”

VisualStudio has forgotten your debug settings. Right-click on your project in the SolutionExplorer pane, and select “Set as startup project”.  In the context menu, you might also want to select Properties|Configuration|Debugging|StartPage and set to path-under-project-dir/your-test-page.aspx

For example, if the project is “WebApp” and the test page is at “WebApp/test/Login.aspx”, then the start url could be “test/Login.aspx”.  The url could also be an absolute one using localhost or your machine’s true IP address.

Print Friendly, PDF & Email

IE6 doesn’t support onclick handlers for

Instead, you have to use an onchange handler in the SELECT, like this:

<html>
<head>
<script>
function fAlertA() { alert(‘A’); }
function fAlertB() { alert(‘B’); }
function fHandleActionSelection(nSelect)
{
var iOptionIndex = nSelect.selectedIndex;
if (iOptionIndex > 0) { //skip over ‘Actions’
var sFnName = nSelect.options[iOptionIndex].value;
eval(sFnName+”()”);
}
}
</script>
</head>
<body>
<select onchange=”fHandleActionSelection(this)”>
<option>Actions</option>
<option value=”fAlertA”>a</option>
<option value=”fAlertB”>b</option>
</select>
</body>
</html>

Print Friendly, PDF & Email